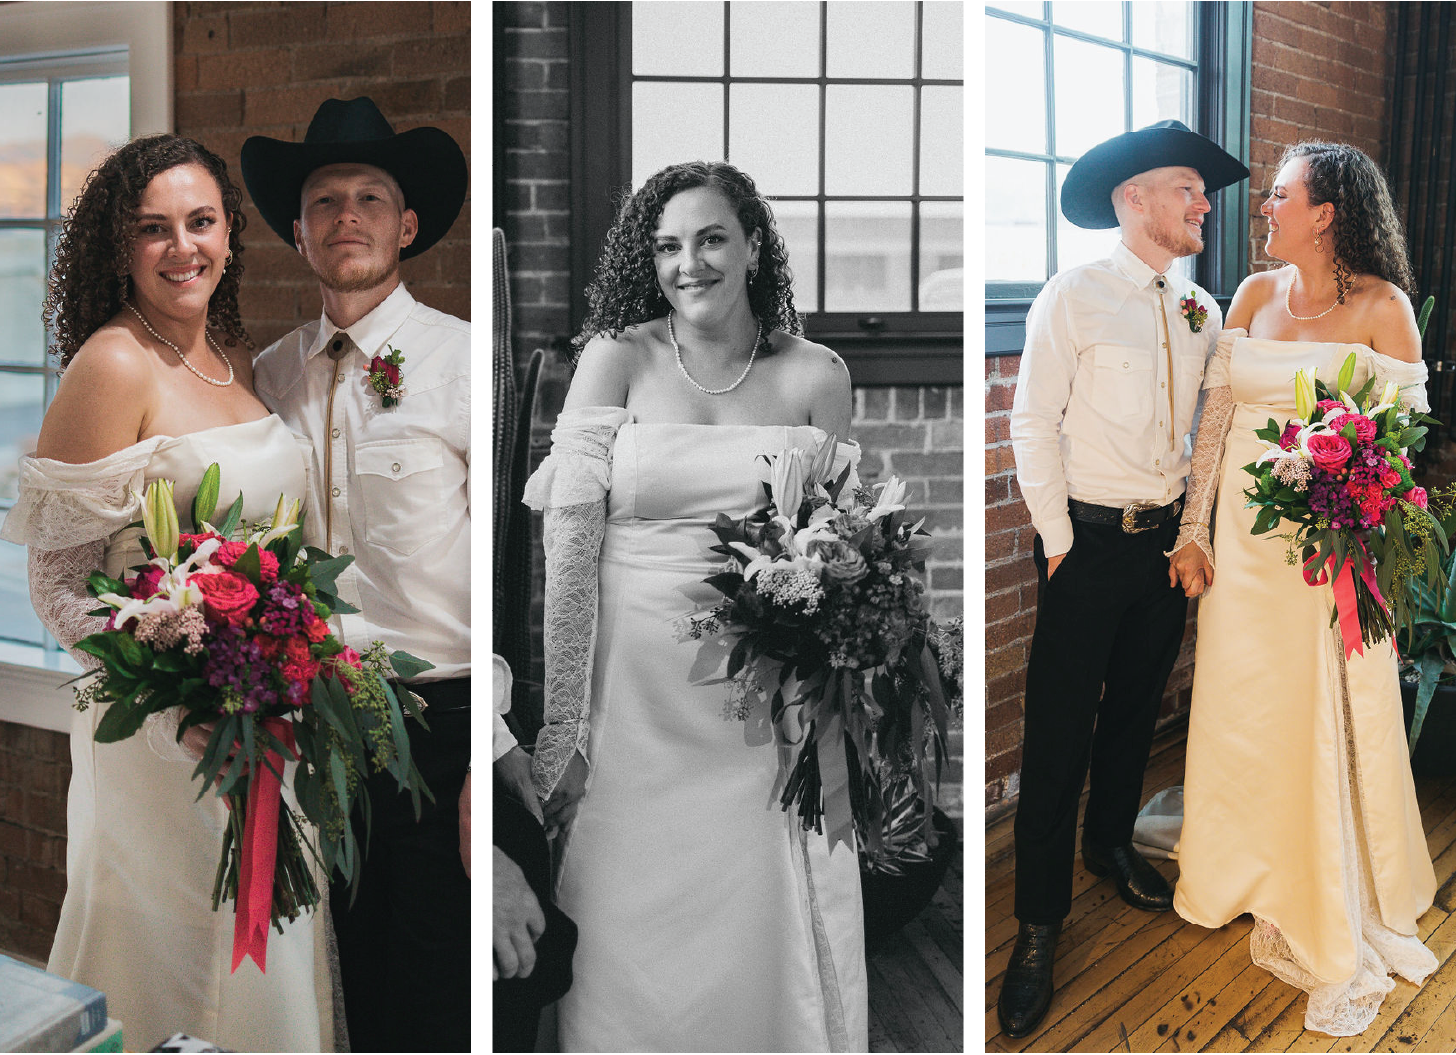
Sewing My Wedding Dress
I sewed my own wedding dress, and finally fulfilled a dream of mine that I’ve had since I was a little girl.
But holy shit was it one of the hardest.
Not only did it take patience, research, books, pinterest, skill and hours of searching the internet.
It’s something I’ve thought about ever since childhood. Like many of you, as a little girl, l was dreaming of my wedding, wearing a gorgeous dress, surrounded by loved ones and flowers. I always daydreamed of what the magical day would look like. But, reality has a funny way of sneaking in once you reach your raging 20s, filled with heartbreak and confusion. A wedding seems like the hardest thing to obtain, let alone an upstanding, kind man (play- Slim Pickins' by Sabrina Carpenter.)
Then, this amazing man, came out of nowhere. Fred swept me off my feet and showed me there are indeed golden men out there. He reminded me of my dad, worked hard, and even opened doors for me. He made me laugh, pushed me out of my comfort zone in the best ways and quickly became my best friend. I fell in love with the man of my dreams, and marrying him was a no-brainer. On September 24th, 2022 we got engaged. And it was fully a reality.
Although he went about it in the most sneaky way, getting all his sisters and mom involved…I was onto him. Please enjoy the most epic engagement photo where I literally leaped feet into the air and screamed “I knew it, I knew it, I knew it.”
Quickly after the engagement, I scheduled to go dress shopping. Before I settled on any type of dress pattern, I wanted to have the dress shopping experience. I was undecided about what type of dress I wanted to create. I wanted to try them on and decipher for myself. I called up my sisters, mom, and grandma Patty Jo, and we spent a rainy morning looking at gorgeous gowns.
It was important for me to have my grandma there, given she is the most talented seamstress I know. She has created thousands of gorgeous intricate quilts, child dresses, dolls, and more. She inspired my love for sewing. She also has the most amazing 1950s and ‘60s style. No matter the day or event, you better believe she’s the best dressed, with her signature perfectly styled blonde bob. Her opinion and expertise were beyond valuable to me as I started this design process.
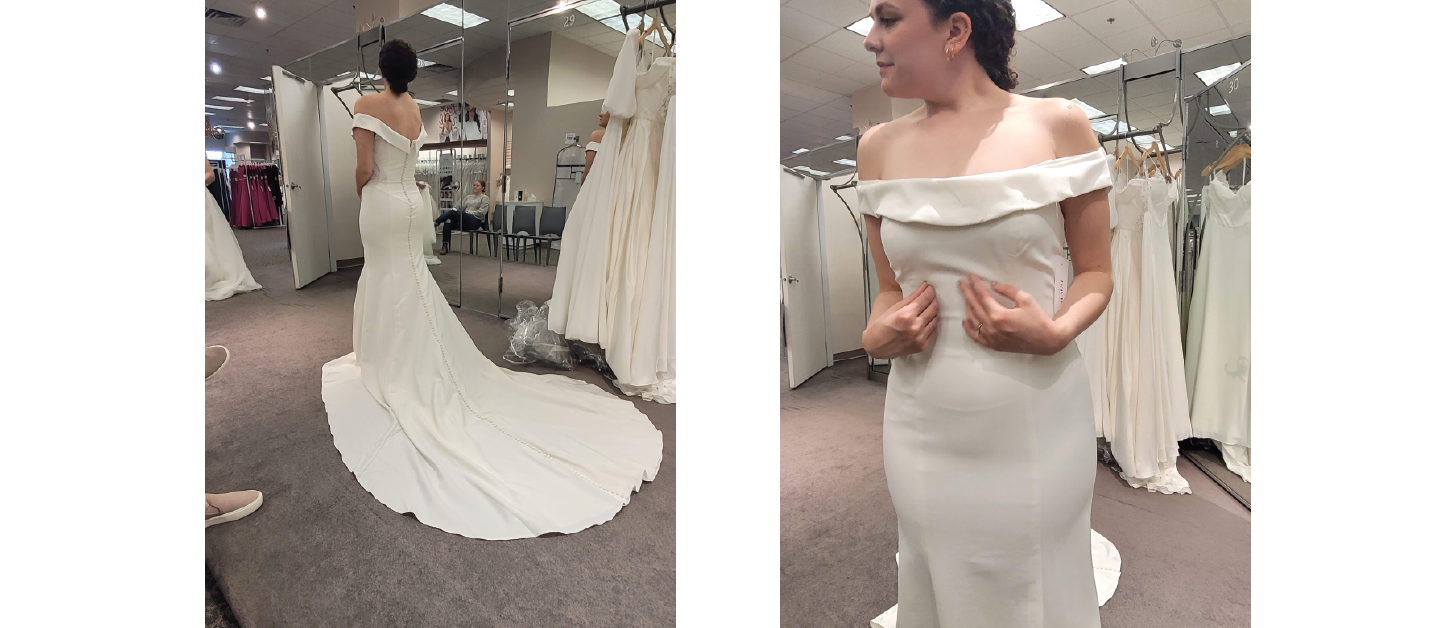
I knew going into this shopping trip that I wanted to just have fun, try on dresses, and focus on shape and material. I scheduled to go to David's Bridal because they were more price friendly dresses. I wanted to feel the material and assess structure from the lower end. I knew going into this, I had a humble budget, and most likely the dresses would have similar material that I would be using. Fabric availability and price point were also a factor. Realistically, to find fabric in Utah, you go to Joanns, a quilting specific shop, or online fabric stores. I was open to going to LA and shopping for material, but would be going with 1 semester of Fabric + Textiles knowledge under my belt.
OK, OK, so we go and try on dresses at David's Bridal. We took a lot of photos, and I vividly remember trying on the dresses, and they were super dirty. A whole lot of ladies had tried on these dresses, and left lots of makeup behind. No shade, I get it, I’m sure I’m included, hahaha. But here, it felt so light-hearted. I was dancing around and experimenting, and playing dress-up in front of my family. I was trying on any and all shapes. Like a little girl, I was ecstatic to try on these gorgeous dresses with fluffy sleeves, poofy tulle skirts, and unique necklines. They were all so different from anything I had worn to any dance or event. I loved standing up on the David's Bridal “stage” and putting on a fashion show.
I had the most fun trying dresses on at this shop. Toward the end, I started to really love unique seams, such as under the bra cup or on the side somehow. Although so subtle, I felt it added a uniqueness to the dress pattern and accentuated the bust in a lovely way. I was surprisingly really loving an open back and over the shoulders, given neither had been styles I had ever tried. I wanted the fabric to be soft and was starting to lean more toward tulle, satins, and flowy materials. Those fabrics felt luxurious and ethereal to me. I knew I liked fun pleats on the skirt, adding dimension and fullness and a tight fit that flattered the bust. I was beginning to gather different puzzle pieces of a dress, I didn’t yet have a full vision of.
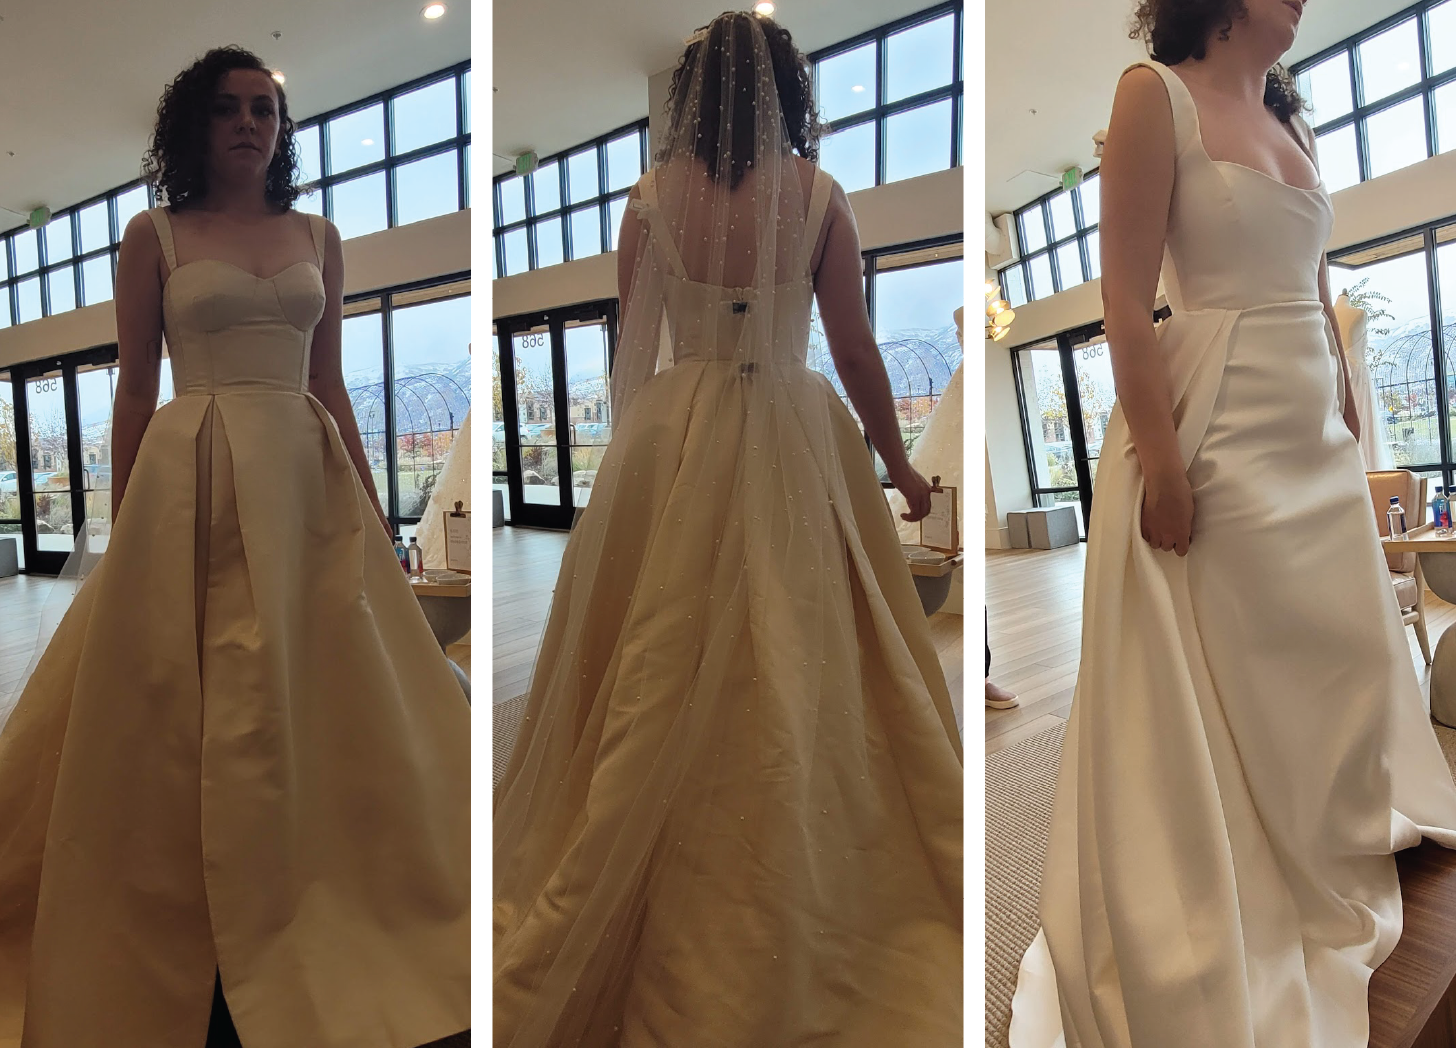
Next, we went to a very fancy shop. It was the type of place straight out of Say Yes to the Dress, with wildly expensive gown you would see walking the runway. But imagine in Utah, where the owner looked straight out of the Real Housewives of Utah County.
But here’s the honest truth, I didn’t have nearly as much fun here. I felt I had to really sell the idea that I just might buy something from this store when I respectfully knew I could not afford to. So I chose to be very critical and analyze these dresses while I had the chance to even touch them. I might not look super pleased in the photos, but inside, I was admiring the dresses at the highest level.
I had considered doing an off-white dress, and the ones available at this shop quickly solidified my decision to do so. The first dress I tried on was a gorgeous satin dress with floral brocade subtly woven through the fabric. The princess seam going to a square neckline was complimentary. The deep pleats flowing into a voluminous gathered A-Line skirt were flattering and classically beautiful. The fabric was so heavy and high quality. The floral weave was intricately spun, leaving the fabric extremely soft with enough structure to hold the volume. It felt like a dress I should wear when running through a field to prince charming. The ultimate “Love Story, Taylor Swift” music video dress style.
Then I tried on this sexy, tight, sweetheart neckline, deep slit dress. Patty Jo was not a fan of it. But it was the coolest example of rich, unique seams and structures, especially with the bustier bodice. It was tightly fitted around my waist and ribs using wires for structure. There were structural seams around the cups connected to a sweetheart neckline. The skirt pleats connected with the bodice seam, creating volume. On one side, there was a deep slit, with a very full train. The fabric was a stiff taffeta, allowing for more fullness and shape. Sweet Grandma Patty asked to confirm multiple times whether I wanted a slit that high or even at all. I wanted the slit.
After I had shut down every dress so far, the lovely sales lady, wearing a phenomenally bright purple designer suit, hesitantly offered me some out of budget tulle dresses. One in particular came in different individual pieces. I tried a classic satin slip dress with a layered tulle skirt on top. The sleeves were tulle-layered ruffles that could be added, or taken off. In hindsight, it makes me laugh– I was so set on this last dress when I walked out of that shop. I had decided I wanted a full tulle skirt, ruffly statement sleeves, and a fun wildly bouncy dress. I was convinced.
Once our appointments were over, I went back to my parents’ house, grabbed a pencil and drew the type of dress I imagined.
Later, as I’m showing my friend all the photos from the shopping trip and telling her what I was finding and loving, as I got to the final dress reveal, I felt a pit in my stomach: I hated it. I didn't like how the dress looked on my body at all and couldn't fathom what I had been thinking then. I became frustrated and discouraged--spending my days grueling over what to do. I flipped through the photos dozens of times in frustration until I realized something. As I painstakingly analyzed each picture, I couldn't stop thinking of the mermaid dress. It was tighter throughout the bodice and skirt, as is expected in a classic mermaid style, but included beautiful princess seams and an elegant off-shoulder sleeves and neckline.
Something about this one felt special. I felt like the shape looked best on my body. I loved the fit on my waist and hips, along with the gorgeous short train. Now, began the research.
I Pinterest-ed like I was addicted– Searching and scrolling any free time I had. I felt so blind going into this skill and technique, yet very sure of my vision.
I would look up tulle dresses, then tulle with satin, from there though my search began spiraling:
1950’s satin dresses
1960’s Dresses
1970’s satin dresses
Vintage wedding dress
Satin A-Line Dress
Statement Sleeve Wedding Dress
A-Line with Slit
Square Neckline
Satin Dress with Lace
Gathered tulle dress
Photo after photo, I was reposting anything similar to my vision. But no matter how long and hard I searched, I really struggled to find the dress that I had in my head.
Check out my Wedding Dress Pinterest board to see all the inspiration come together.
Analyzing how different dress silhouettes fit, and take shape when photographed, was the greatest research. I continued to find different pieces to fall in love with, in a wide array of different dresses. At times, it felt overwhelming, with the amount of options I would be presented with. As I fine-tuned my search, I narrowed down my vision.
My whole life, the dresses I pinned were far more covering. It was the first time I could explore different styles, it felt childishly exciting to analyze the most beautiful dresses I could find. Although, I did have some doubts at this time. No matter how much I searched, I couldn’t find a dress that immediately jumped out and told me it was the one, no matter how many hours I searched.
In November 2022, (11 months until the wedding) I found Danielle Frankel. (I’m thinking I’ll make it a personal holiday. It felt so monumental, and then I just looked at the date as I’m writing it, and it’s 11/11. So holiday? I think yes.)
I found her designs and it felt like this gorgeous spot on the internet that was finally giving me what I was searching for. Finally, I found the tulle, satin, and lace dresses I was looking for. They had an airiness, warmth, and luxury that I had not found previously. The way she photographed the dresses, and the effortless silhouettes and structure, took my breath away. It was 10 PM when I called my oldest sister. I showed her the designs because my heart couldn’t wait to share them with someone. They felt special, and I knew I needed to go in whatever direction Danielle Frankel was going.
Yet, none fit what I wanted. They all were only pieces– This skirt, with this bodice, with this neckline, with this sleeve. None of the dresses had exactly what I wanted. In my head, my dress felt like a sister, or the perfect addition to Danielles collection.
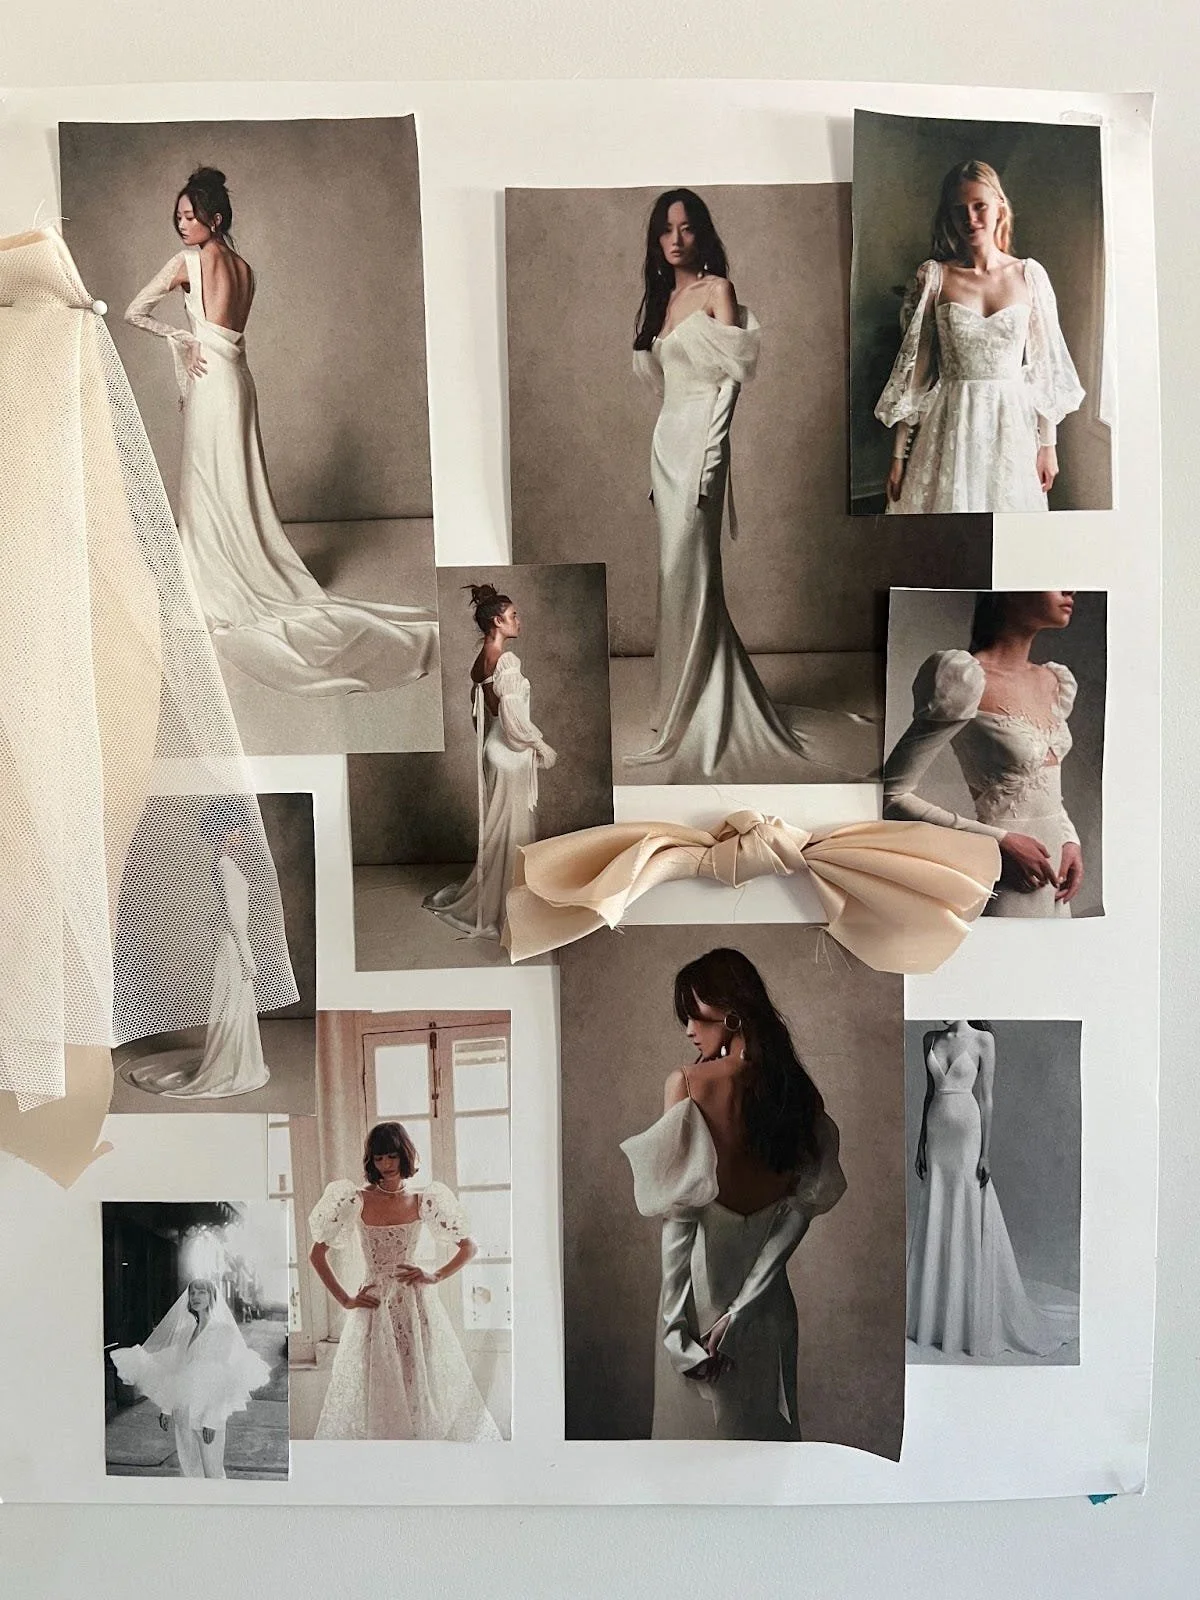
This clearer vision came with new research. Here I leaned heavily into searching vintage, satin dresses, specifically in the 1920’s and 30’s. I leaned into A-Line styles of skirts, with a tighter fit around the waist and hips. I decided I wanted statement sleeves, either with tulle or gathering. Still, I was searching in hopes of finding one dress on the internet that perfectly fit what was in my head. I never did. Never. It all was just pieces of one dress here, and another there. In hindsight, I knew what I wanted. I knew all the pieces. As I learned more, I solidified those pieces and kept moving forward. Naturally, I created a mood board of my absolute favorites.
As the new year was approaching, I was feeling anxiously excited to start sewing. The next step was to invest in a sewing mannequin form but I had yet to save the money to get one and this was quite the investment. Often, these are hundreds of dollars- depending on the shape, size, and extra bells and whistles.
One day, I was having a conversation with a coworker. I was talking about my dress, and the dress form was brought up. Out of nowhere, she started questioning me further, asking exactly what I was looking for. She told me that she had one, and if it’s what I needed, it was all mine.
I, with no question, took this mannequin, hoping and praying it would do what I needed. It felt like a miracle at that time. Although it is not a traditional sewing mannequin, it still worked exactly how I needed it to. It was my perfect size and I saved $600 bucks. I still feel so immensely grateful for how this fell together.
Now that I had the tools I needed to create the dress, it was not time to actually start to play with fabric, start designing, sewing and constructing it.
It was time to start playing with the fabric. I felt it was fairly early on in the process, yet pressured to figure out what I wanted, to give me enough time to design. So I went and bought cheap fabric to start experimenting with.
I spent nights, even full-nighters just playing and draping the fabric. I would create different patterns, silhouettes, and more. I really enjoyed touching and feeling the fabric, as I tested different pattern design and draping techniques. I had never designed in this way, and it felt so creatively free and satisfying. In the past, I had stuck to the traditional sewing patterns. Whereas here, I was specifically shaping the fabric to the mannequin. Each different design and technique I figured out what I liked, and even more so, I figured out what I didn’t.
I tested different bodices and tried to figure out exactly how it would need to be structured. I tested different sleeves and skirts and had fun experimenting and exploring. I really enjoyed testing different ways the fabric could potentially fall and flow into the different skirt styles and trains.
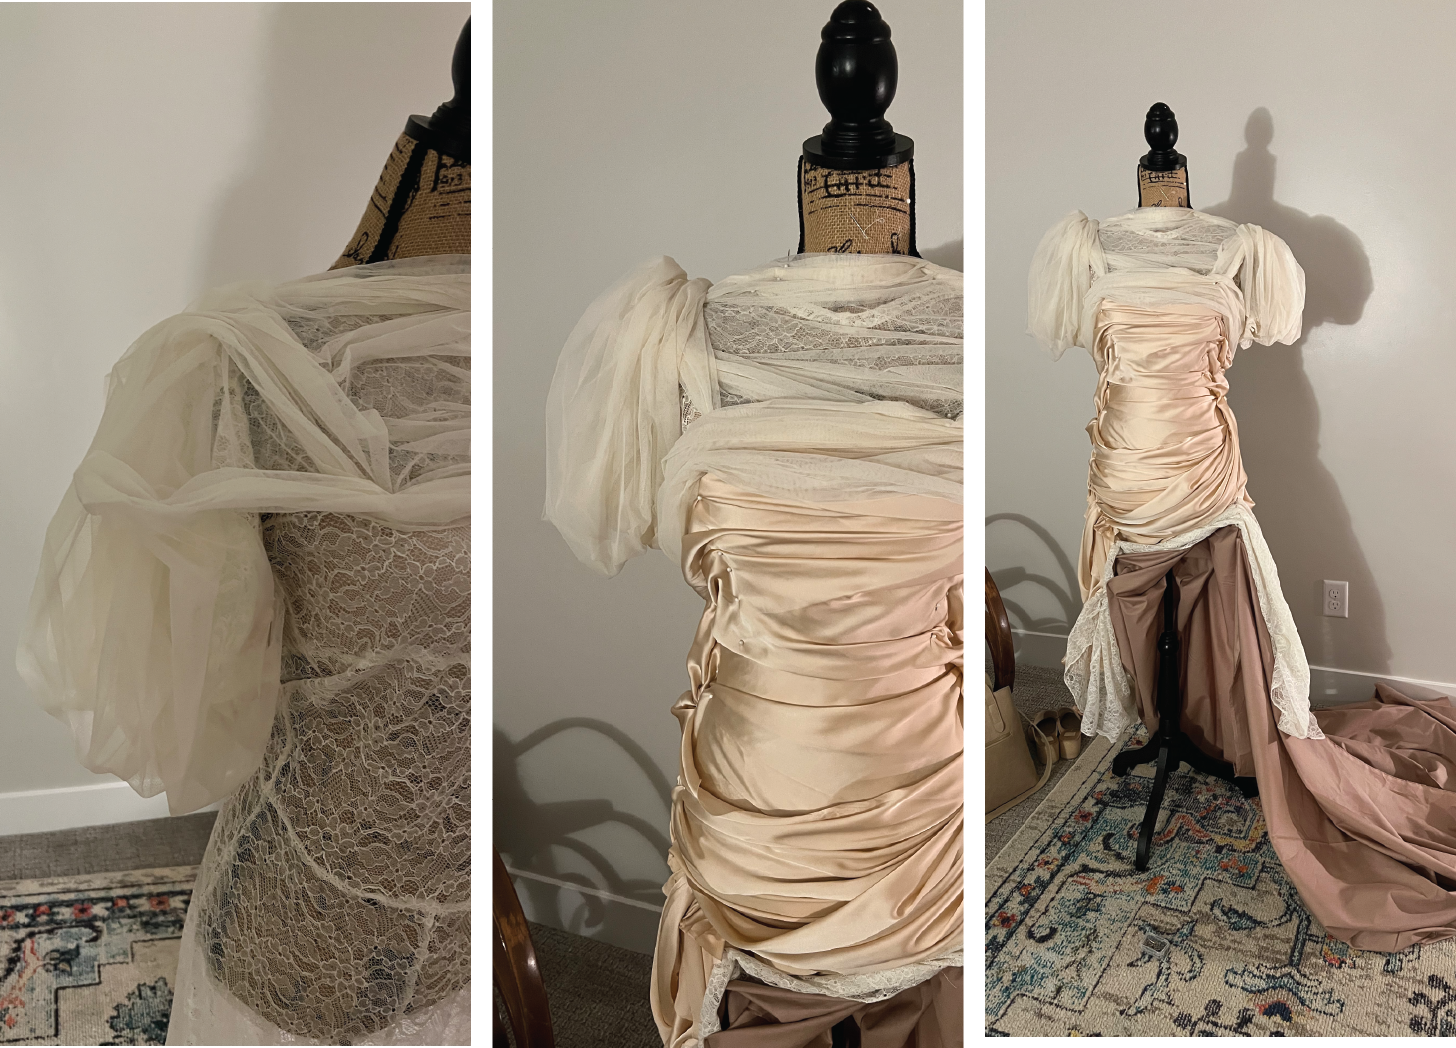
One night, I couldn’t sleep. I had so desperately wanted to test draping techniques with the tulle, satin, and a old lace vintage dress I had. Once my love had fallen asleep, I snuck out of bed and started draping. I stayed up for hours just pinning, draping, and experimenting with the fabric that I had. In that moment, I felt like I was onto something. Pin by pin, so focused on each and every pleat and gather. I ended the night at 4 AM, exhausted, and crawled back into bed.
I woke up dazed that next morning and I walked out to the living room and saw what I had done. Rather than fitting the fabric smoothly to the mannequin, I draped it in pleated layers, from top to bottom. I gathered the sleeves into round layered bubble sleeves. The tulle was over the lace, so that the lace peaked through slightly. It went tightly down to the hips, then fell to the floor into a mermaid train. I ran out of fabric by the time I got to the skirt, so I used some brown muslin to create the vision.
Once I looked at the full dress from afar, it sure didn’t look like what I had in my head. I left it there for days, and the more I looked at the dress I had delicately draped together, the more I hated it. The way the tulle fell and the way the fabrics mixed together, just got worse and worse.
But I am so grateful for it. It took that idea that was in my brain, and completely smushed it. I needed to get it out. I needed to work with the fabric that way. I needed to stay up and feel confident in my draping skills, to be able to look from afar and, cringe. At this moment, I knew what I did not want.
So then, what the hell did I WANT?
I was forced to go back to the basics, after this ugly sister rendition. Back to what I was sure of. I was sure of the fabric choices. But I needed to feel sure about the silhouette before moving forward. Online research was no longer getting me what I wanted. So rather, what better place to look, than my wardrobe?
My wardrobe was full of items that I genuinely loved, felt confident in, and cherished. Some key items that stood out, were my more unique pieces: statement puffy sleeves, little button details, crisp gathers, and seams that accentuated the bust.
I also noticed all the high-neck, tight, long-sleeve, soft, cozy layering tops I have collected and are a statement in my closet.
Now, I was sure of what I felt most confident in based on my favorite wardrobe pieces. At this point, it was a matter of translating my favorite styles into a elegant wedding dress.
Once I narrowed down my favorite sleeves and necklines, I decided to sew a few different blouses to practice. No better way to know for sure what I love than to create it myself.
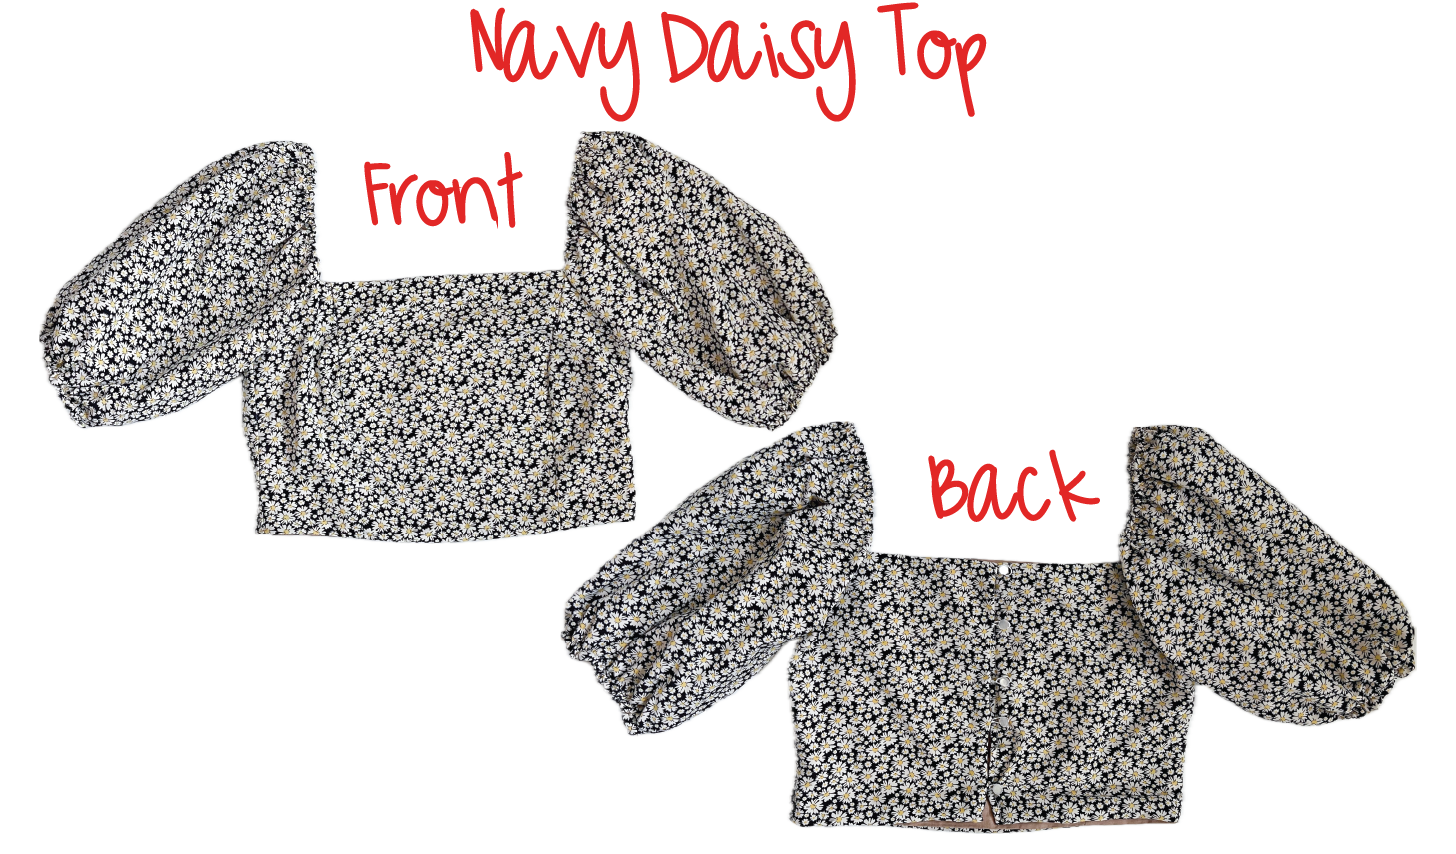
I first made a navy daisy top, with a tight princess bodice, and puffy gather bubble sleeves.
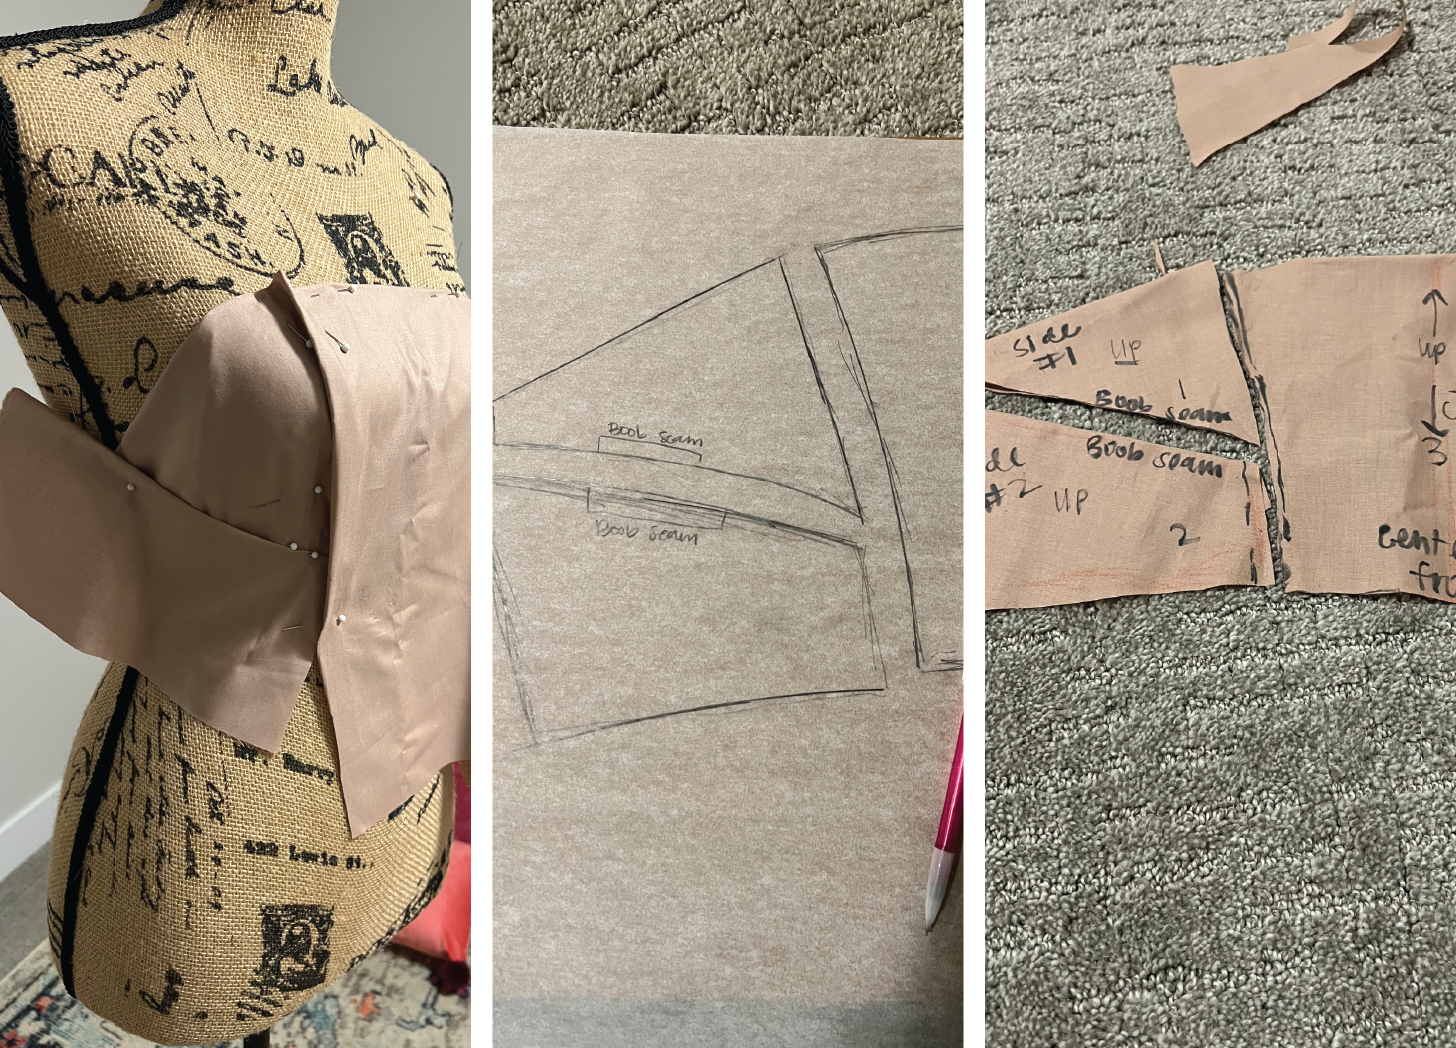
I really liked the bodice on the navy daisy top. The princess seams connected to the waist exactly how I wanted and accentuated the bust beautifully. The pattern was a fairly simple design, but that’s what I loved about it. I decided to move forward with that front bodice pattern for the dress, knowing the back bodice would change.
Next, I decided to test out a few different sleeve styles. I found a pattern set on Etsy that had a handful of sleeve patterns that I was interested in.
I set out to make a bright red blouse, with the same princess seam bodice, with Mutton style sleeves. I liked the Mutton style, because of the volume and gathering on the shoulder, with a tighter forearm. Gathering the sleeve by using elastic around the shoulder was new to me. Because the sleeves were only attached at the armpit, attaching them to the bodice was quite the struggle. I succeeded nonetheless despite them not being even - but only I will ever notice haha!
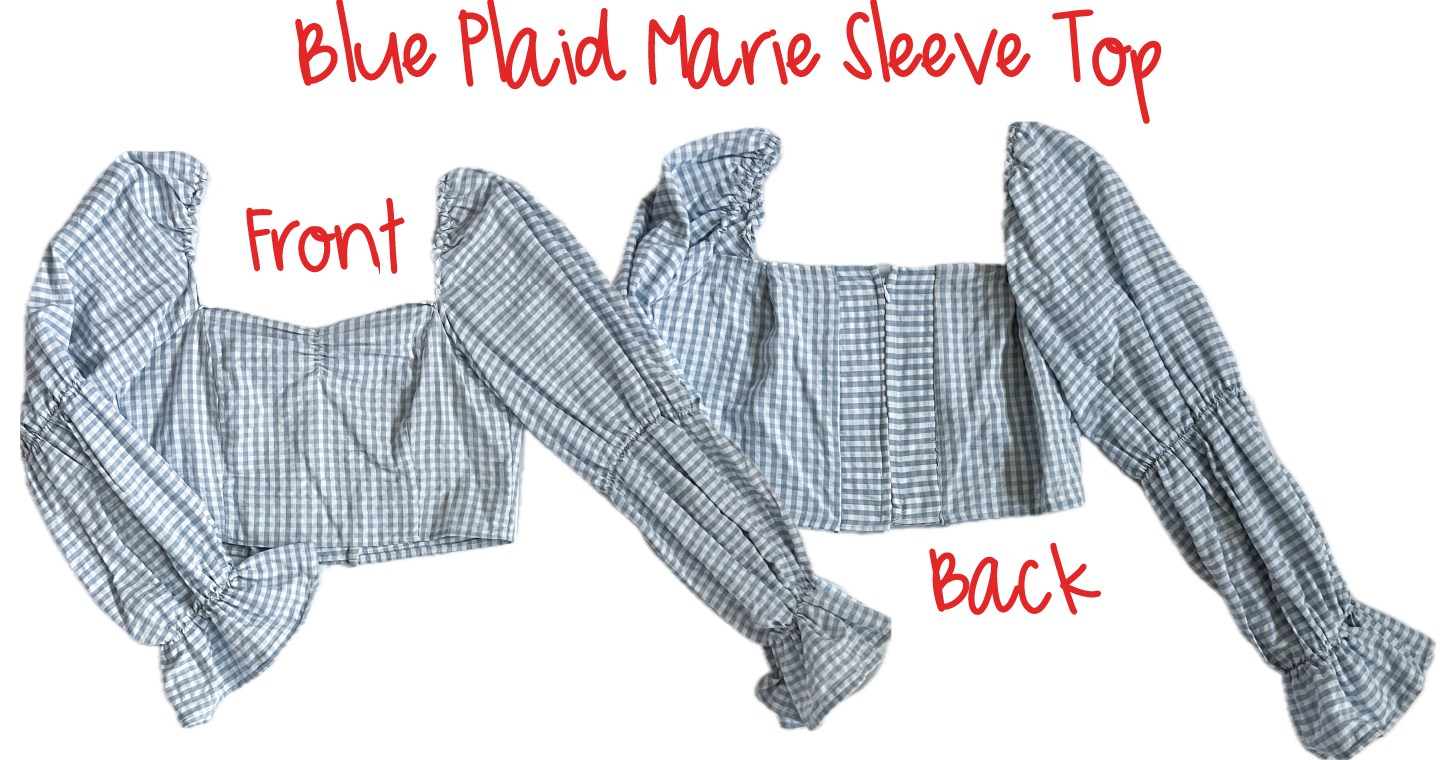
Once I completed the red Mutton sleeve top, I set out to make a blue plaid top, with Marie sleeves and a sweetheart neckline. Marie sleeves are one of my favorite styles, where typically elastic is used to create a tiered gathered bubble-like sleeve. I used the same bodice pattern but gathered the center bust with elastic to create a sweetheart neckline.
By creating these three different tops, I felt confident in the front pattern for the bodice. The different sleeves gave me a great idea of what I wanted, but I wasn’t completely set on a style yet.
Now, I needed to set out to find the main body fabric. I decided to order a bunch of satin swatches from Mood Fabrics. I ordered swatches from various price points, focused on satin-like materials, and off-white coloring. At the time of ordering, I was still undecided on the second material I would use– tulle or lace.
After ordering a few swatches, I landed on two that I liked. One was going to be about $70 a yard, and the other $8. The $70 satin had a heavier weave. It was extremely soft, and far more weighted. The coloring was leaning a very pale cooler toned nude. The $8 satin was also very soft, but had a slightly lighter weave. The coloring was a classic cream with a yellow base. I wanted the fabric to fall and flow almost like smooth satin liquid, and I felt both materials would achieve the look. I was willing to pay for the higher price material, and was set on it for a few weeks. One day I noticed my grandma's antique lace dress next to the $8 satin fabric, and the coloring looked almost identical. It matched so perfectly. I had been so set on a nicer weaved fabric that I hadn't realized I actually cared more about the coloring. I still didn't know exactly how I was going to make the lace work, but at that moment, the coloring solidified my decision to use the $8 satin and Patty Jo’s priceless lace dress.
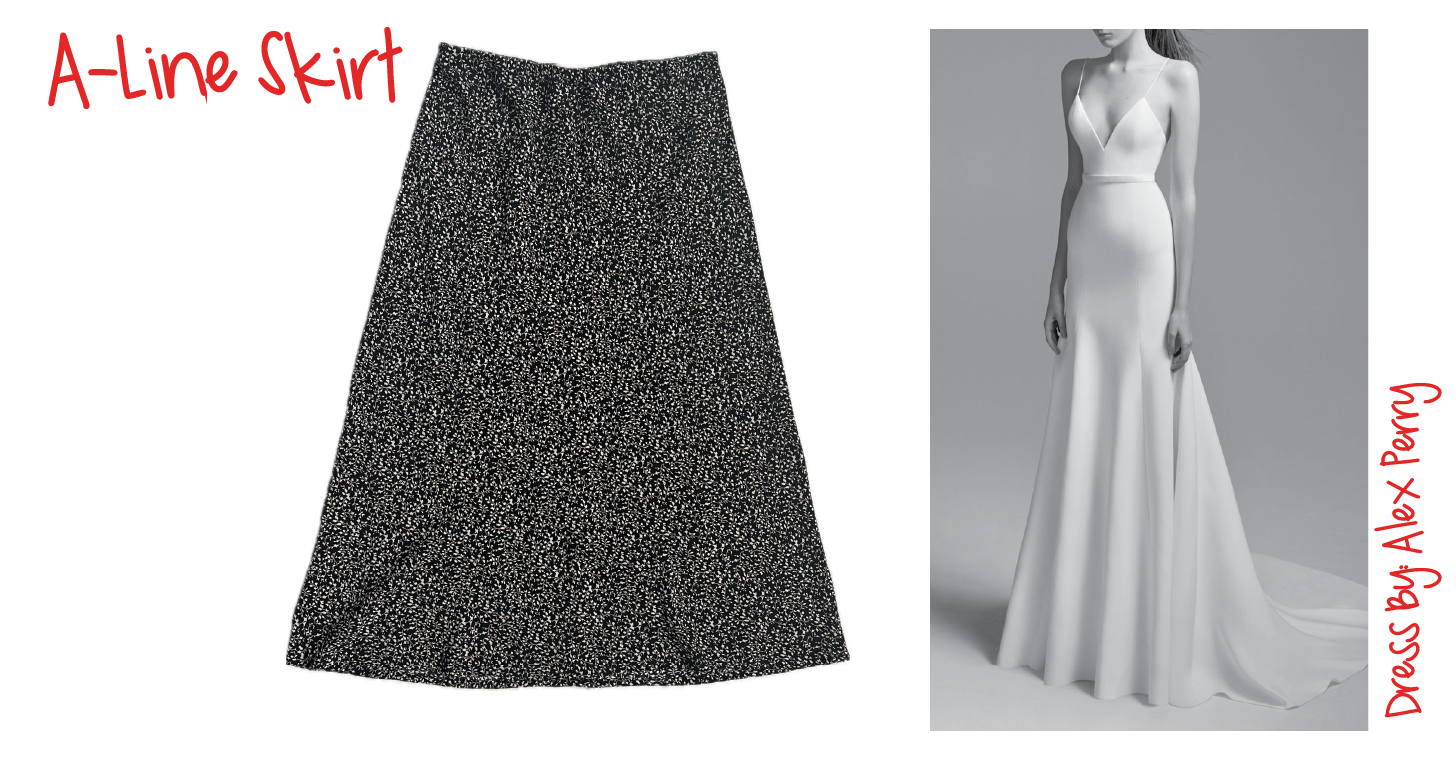
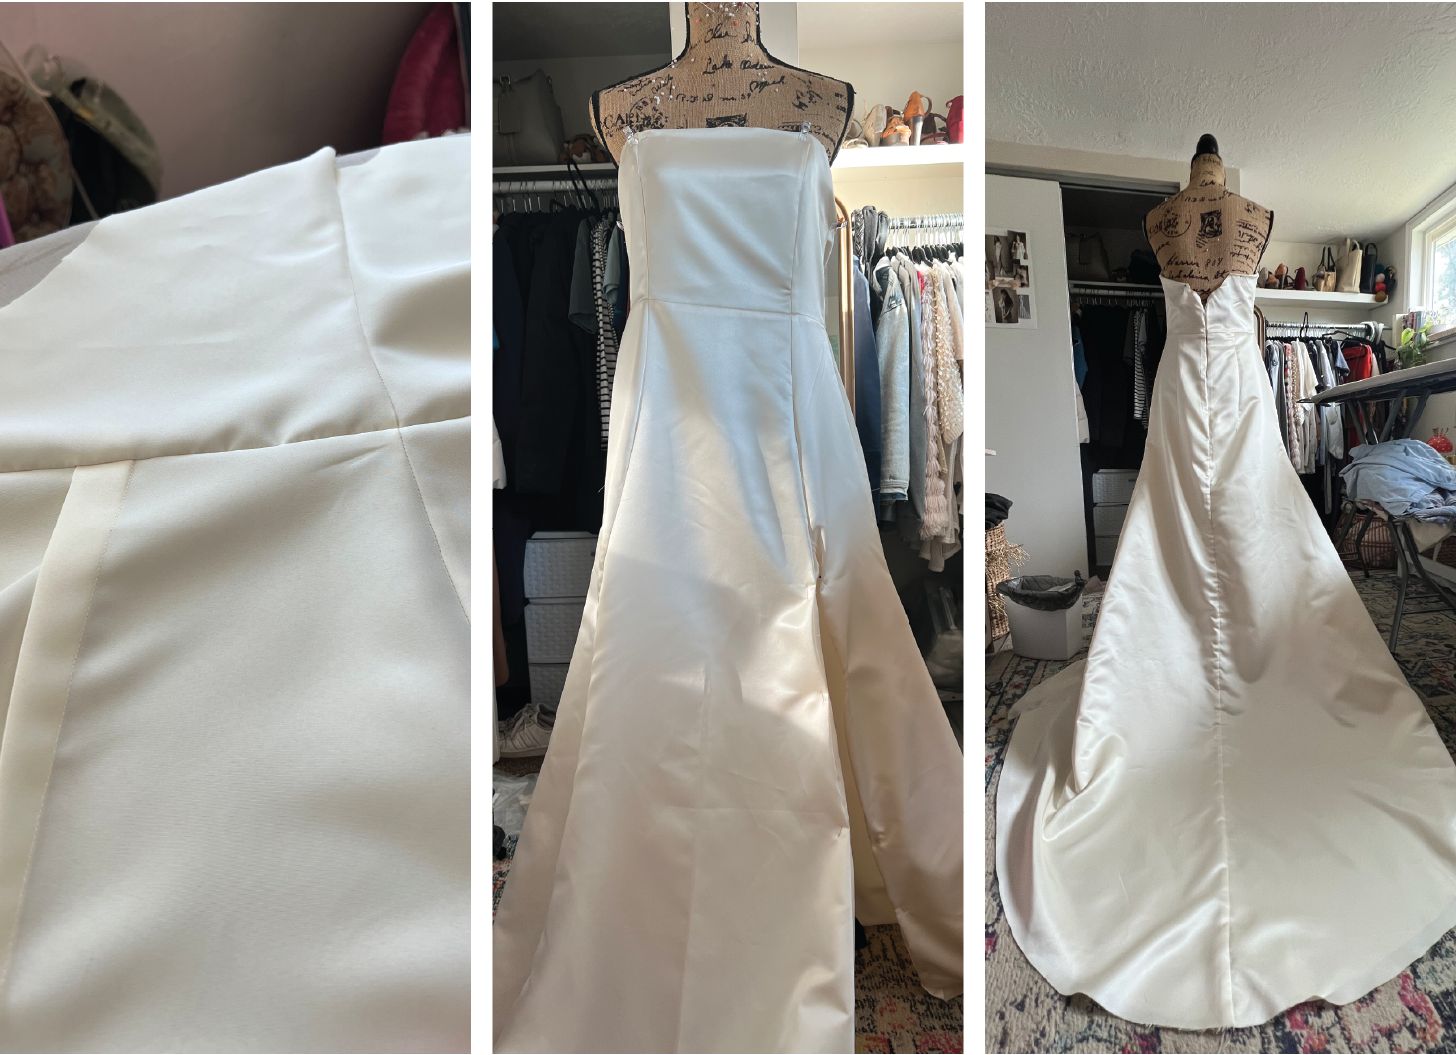
Amongst figuring out the bodice of the dress, I had decided on a semi-simple A-Line skirt, with a slit. There was one specific dress image that I adored since my teenage years. Once I had settled on using satin, the skirt shape was decided. I also have a skirt in my wardrobe with a slightly similar fit. I knew it would look good and I was “sticking to it. Since I was confident with the skirt style, I decided to dive into constructing the skirt pattern first.
(Dress by: Alex Perry)
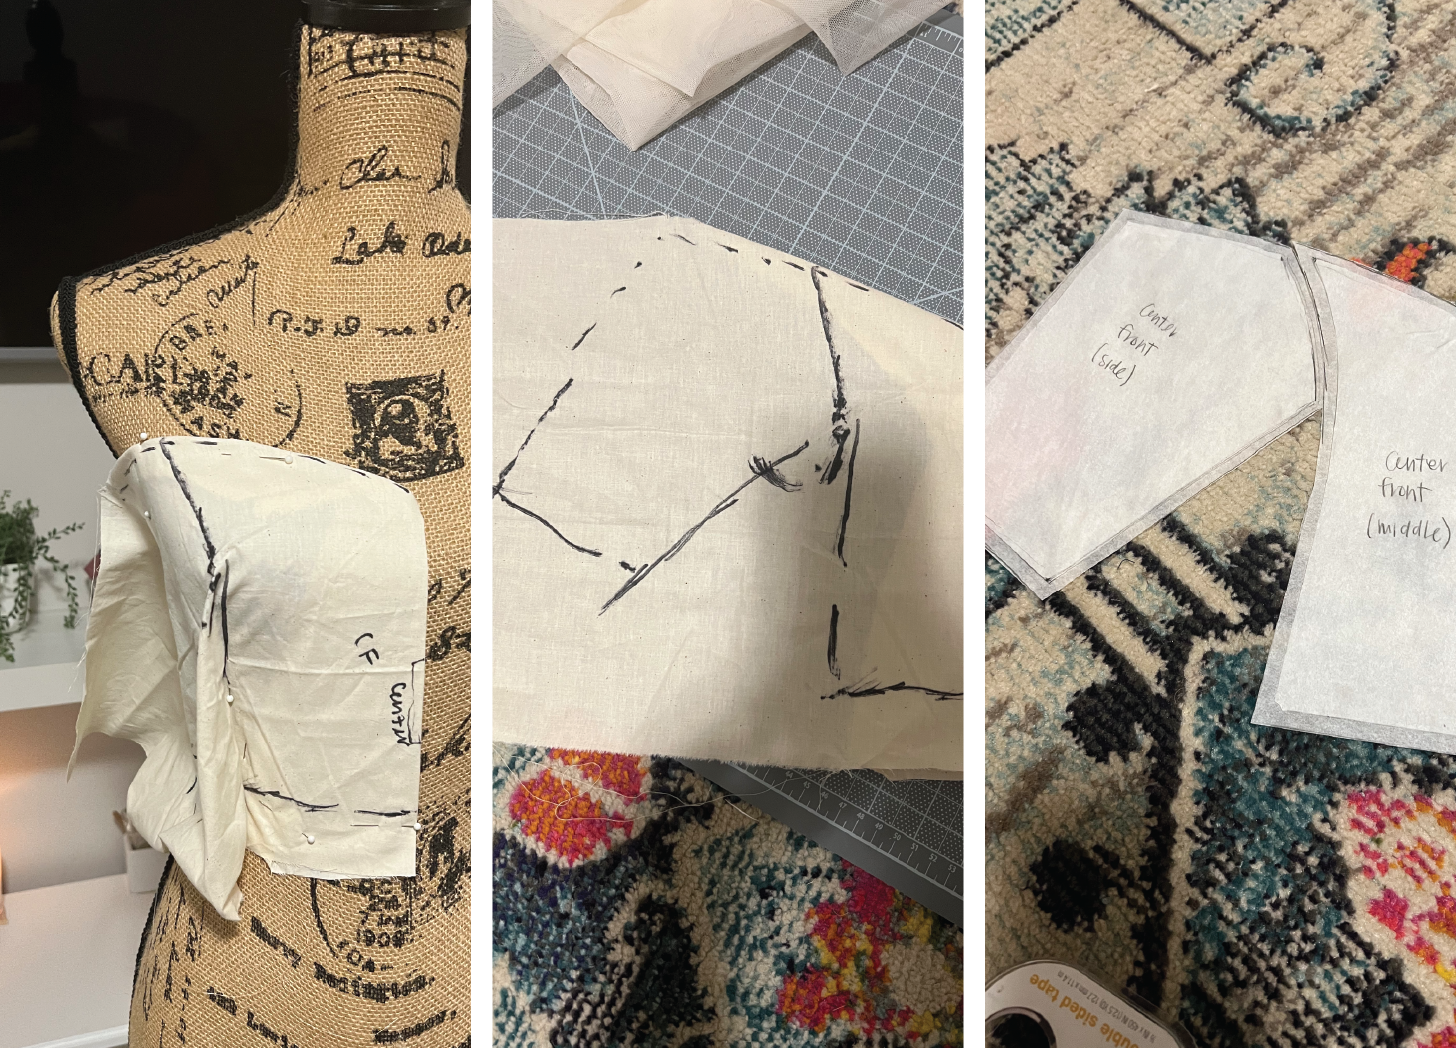
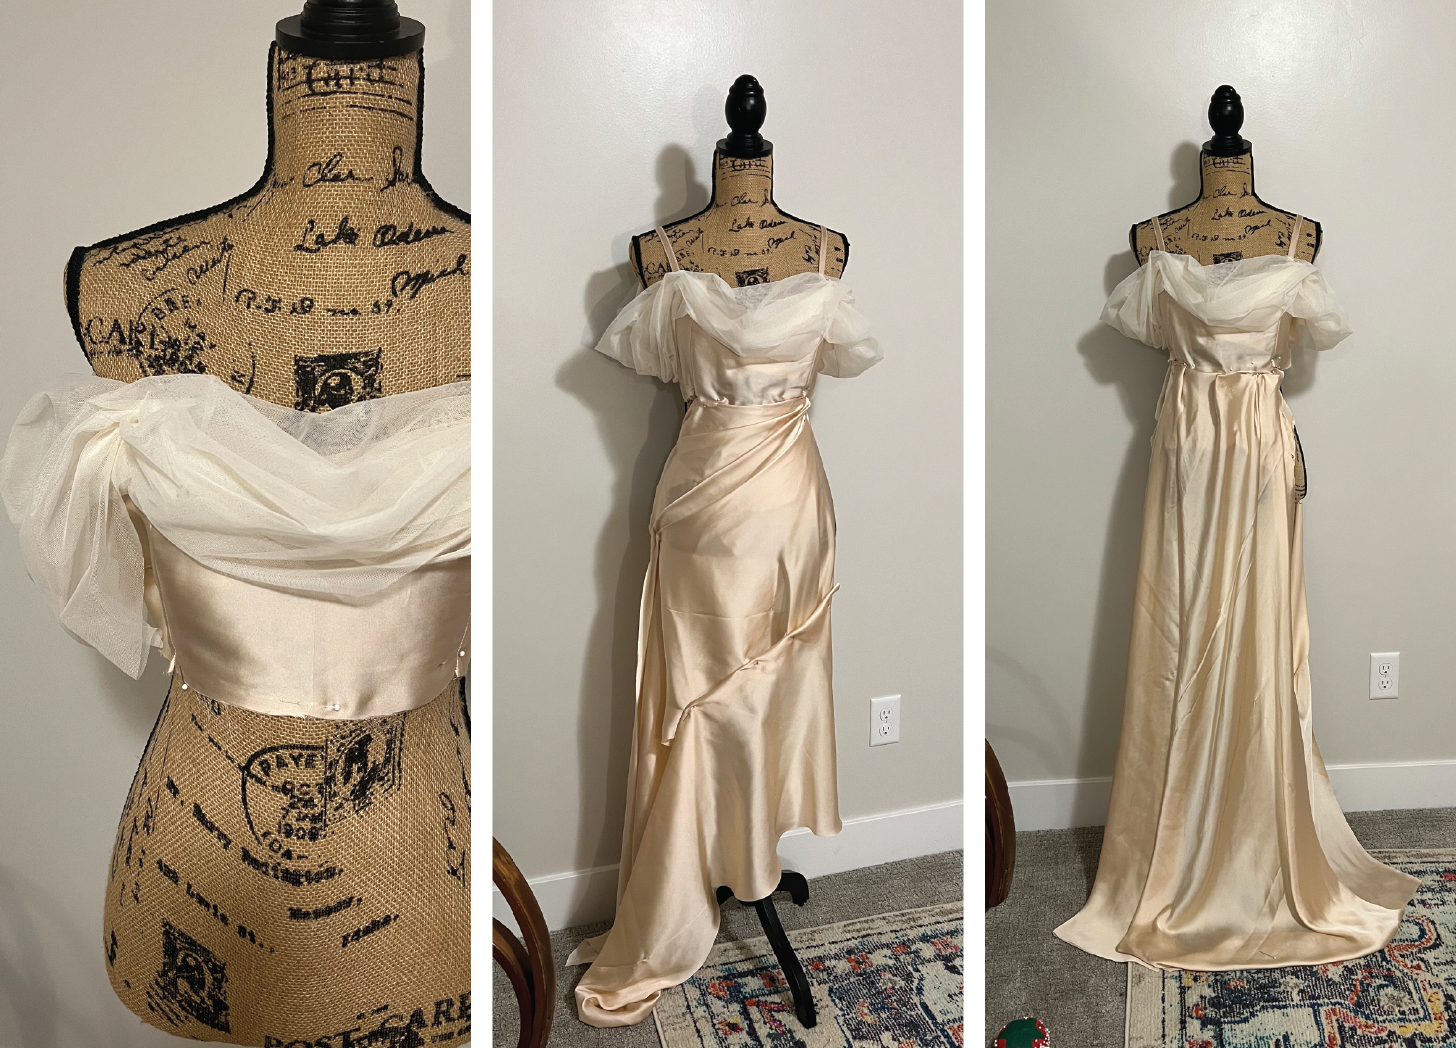
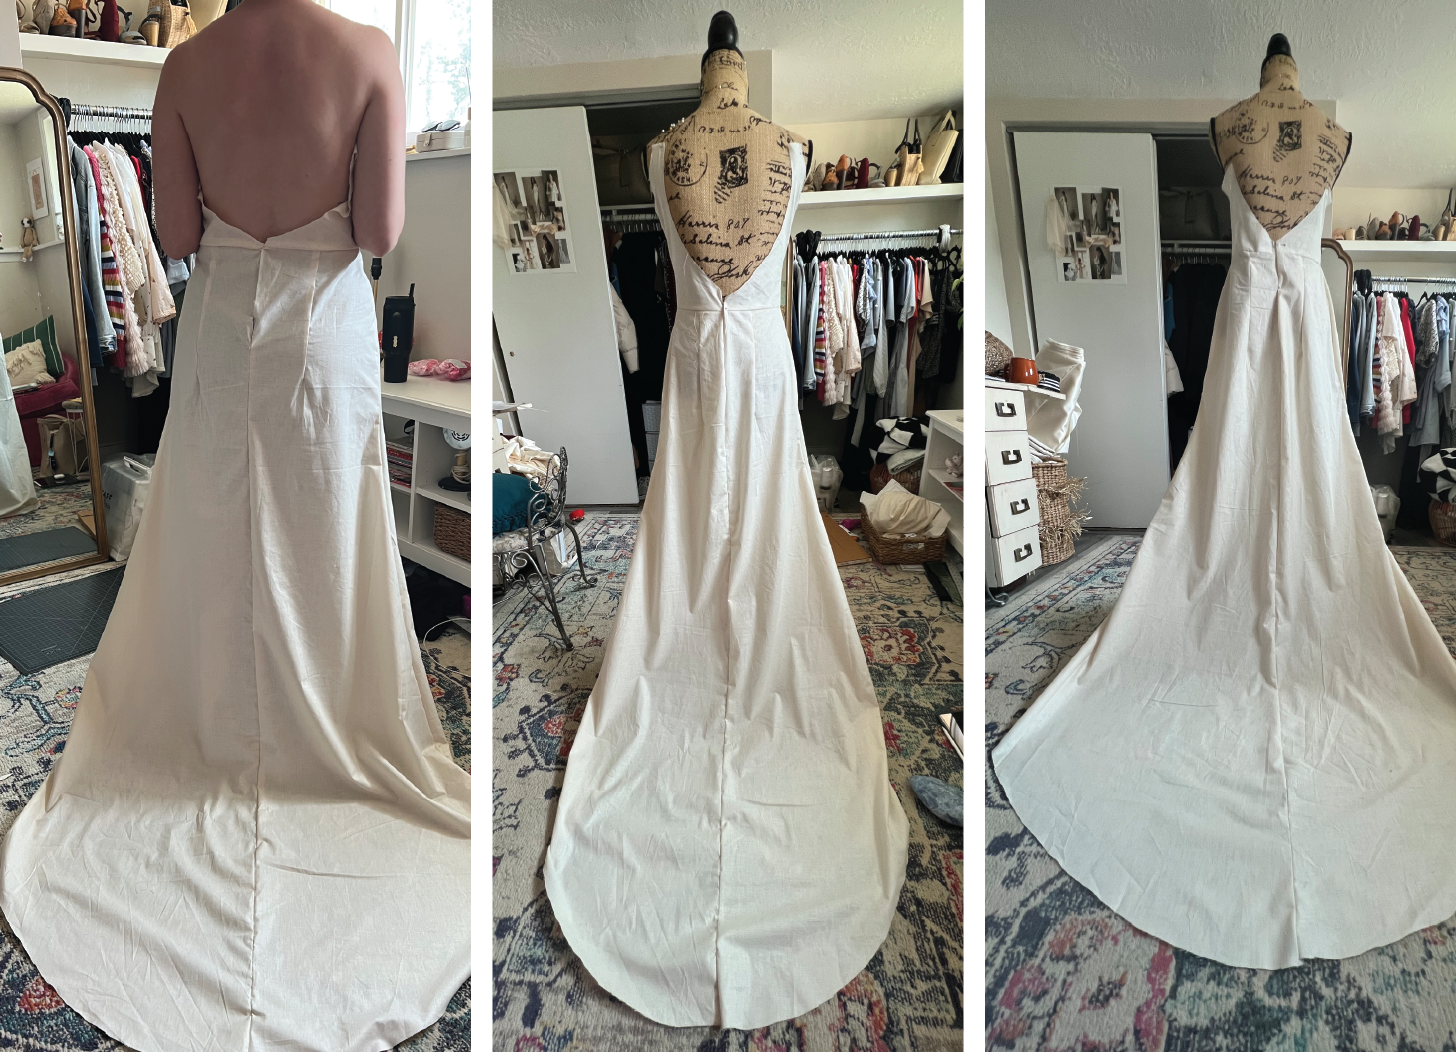
At this point, I accepted that no Etsy pattern would suffice and I would need to make the skirt to my measurements, and truly design it myself. The train was an entirely different challenge. I bought the 5th edition Pattern Making for Fashion Design by Helen Joseph Armstrong for assistance. I wanted a fitted A-line skirt that went loosely down into a small train. I used muslin to create many different renditions until I felt I got it right. I perfected the train literally by just cutting and making sure everything would flow back the way I wanted it to. This determined where I needed to put more fullness at the bottom for it to flow the way I wanted.
I wanted the princess bodice seams to match up perfectly with the seams on the skirt waist. I changed them slightly throughout the different samples to add more curves rather than them being straight and parallel. This allowed them to be more curved to my body. The seams on the back bodice were tricky, but crucial, knowing that most likely, I would have a fairly open back. I needed to structure it to accommodate the low back, along with adding a zipper and buttons.
After much trial and error using the muslin fabric, I felt confident enough in the skirt, to cut the final satin fabric. Typically, nice dresses are structured with an inner lining that is sewn on the inside of the dress. The lining adds structure and covers any raw seams. The lining is typically made in a different fabric from the main body. For example, a wool coat would have a satin lining. I made the decision to get enough fabric, that I could make the full dress in both the lining and main body. This allowed me to have one last final draft, that would live inside, and give me one last chance to adjust anything. This really came into play when I did indeed decide to adjust the seams and fit slightly on the final skirt. Although I had felt confident in the previous trials, once created, I added more curves to the seams, and more flare to the bottom of the skirt.
I created the entire lining, and then started to experiment with the sleeves.
Throughout the entire process, my grandma’s lace dress, crafted by hand by 19th- century nuns, would not stop nudging me.
You better believe that Patty Jo has an entire secret compartment within her house that holds her most precious lace. The lace she owns is worth far more than you would believe. It’s intricate, delicate, and absolutely stunning. I am honored to be in possession of the pieces she’s given me. To know where her lace is secretly kept is honor enough!
I hadn’t originally planned on working with lace, due to the availability and price point of finding quality lace. I knew what high-quality lace looked and felt like, and I wasn’t going to settle for less. Patty Jo gave me a dress on my birthday a few years back. When she gave it to me, she even said, “This could be your wedding dress!” The piece alone wasn’t what I envisioned for my wedding dress, and I was weary of changing or destroying such a precious piece.
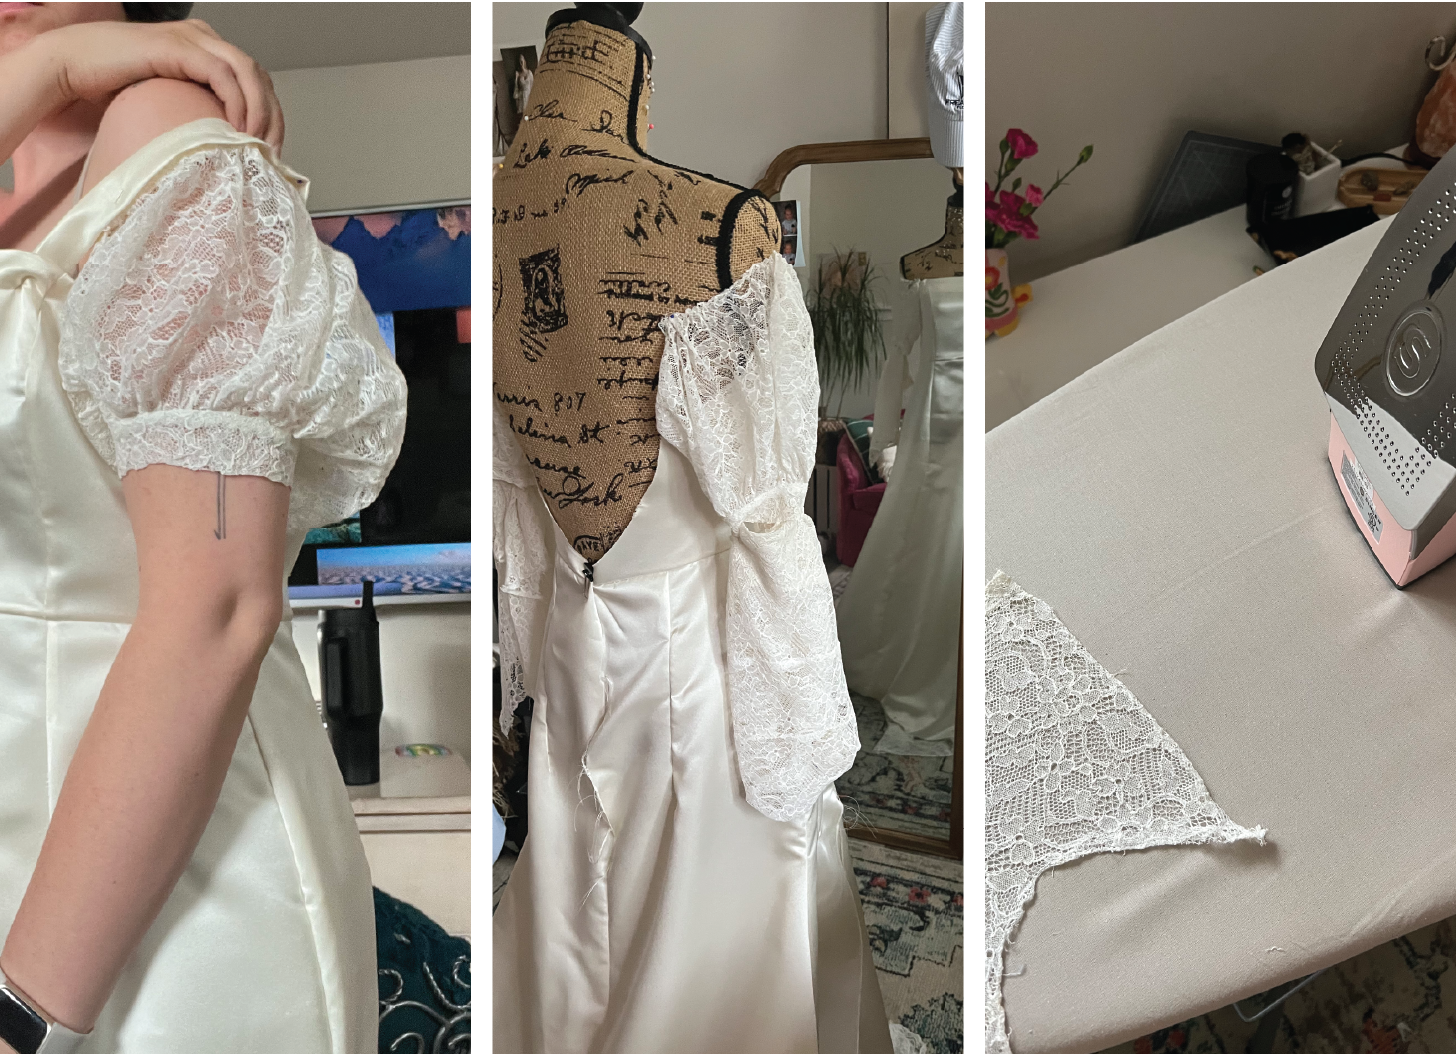
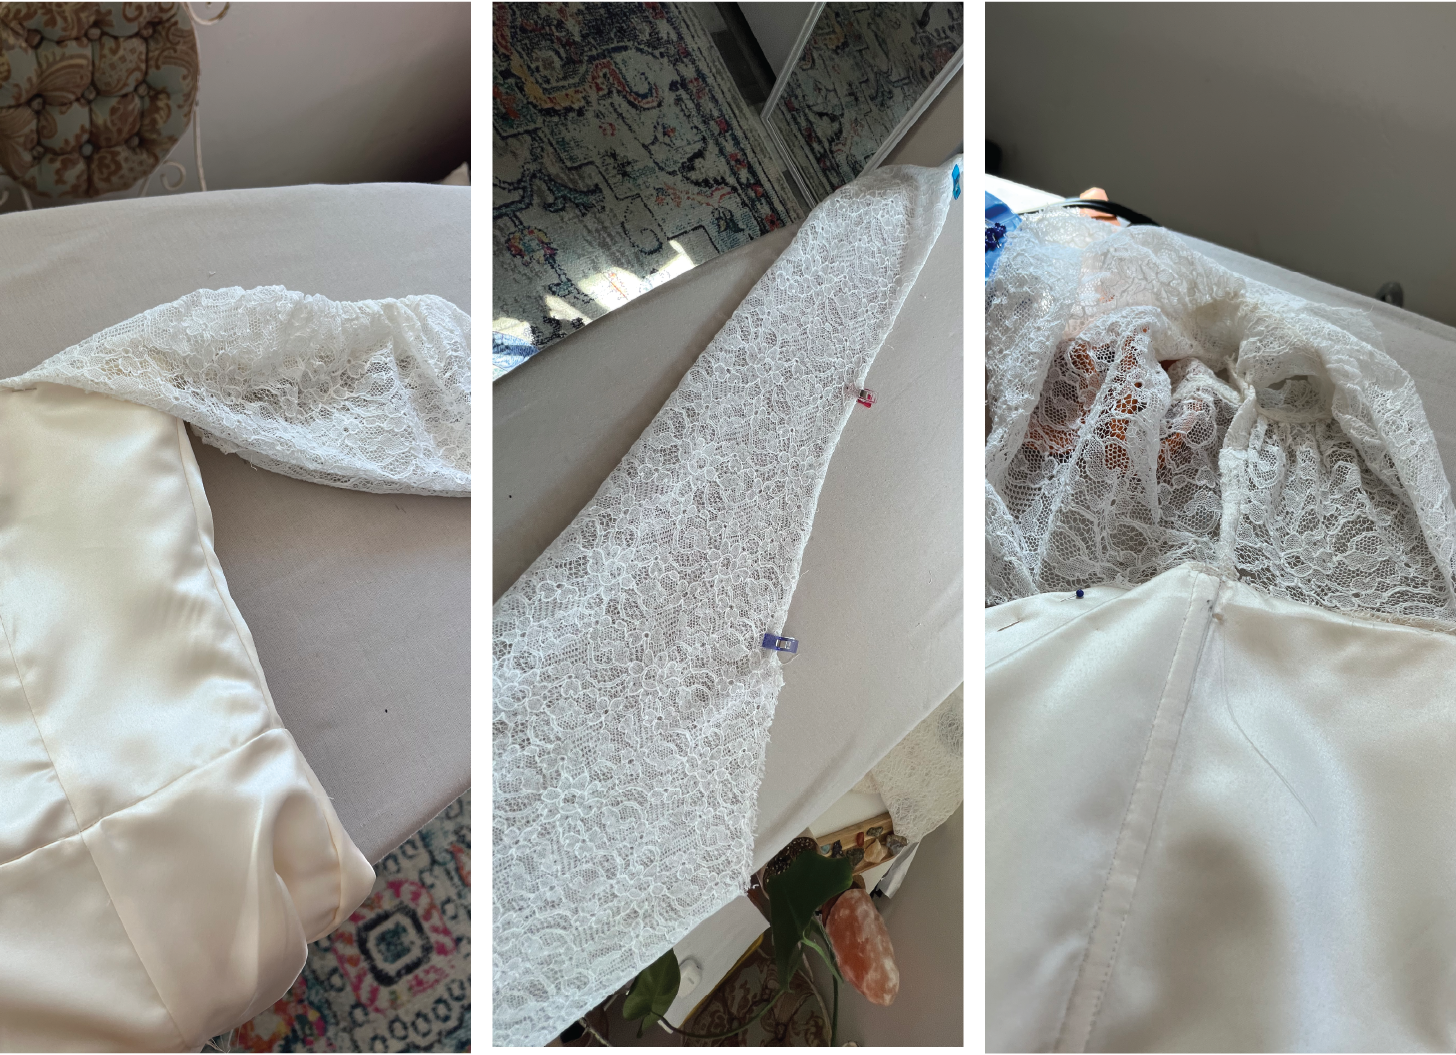
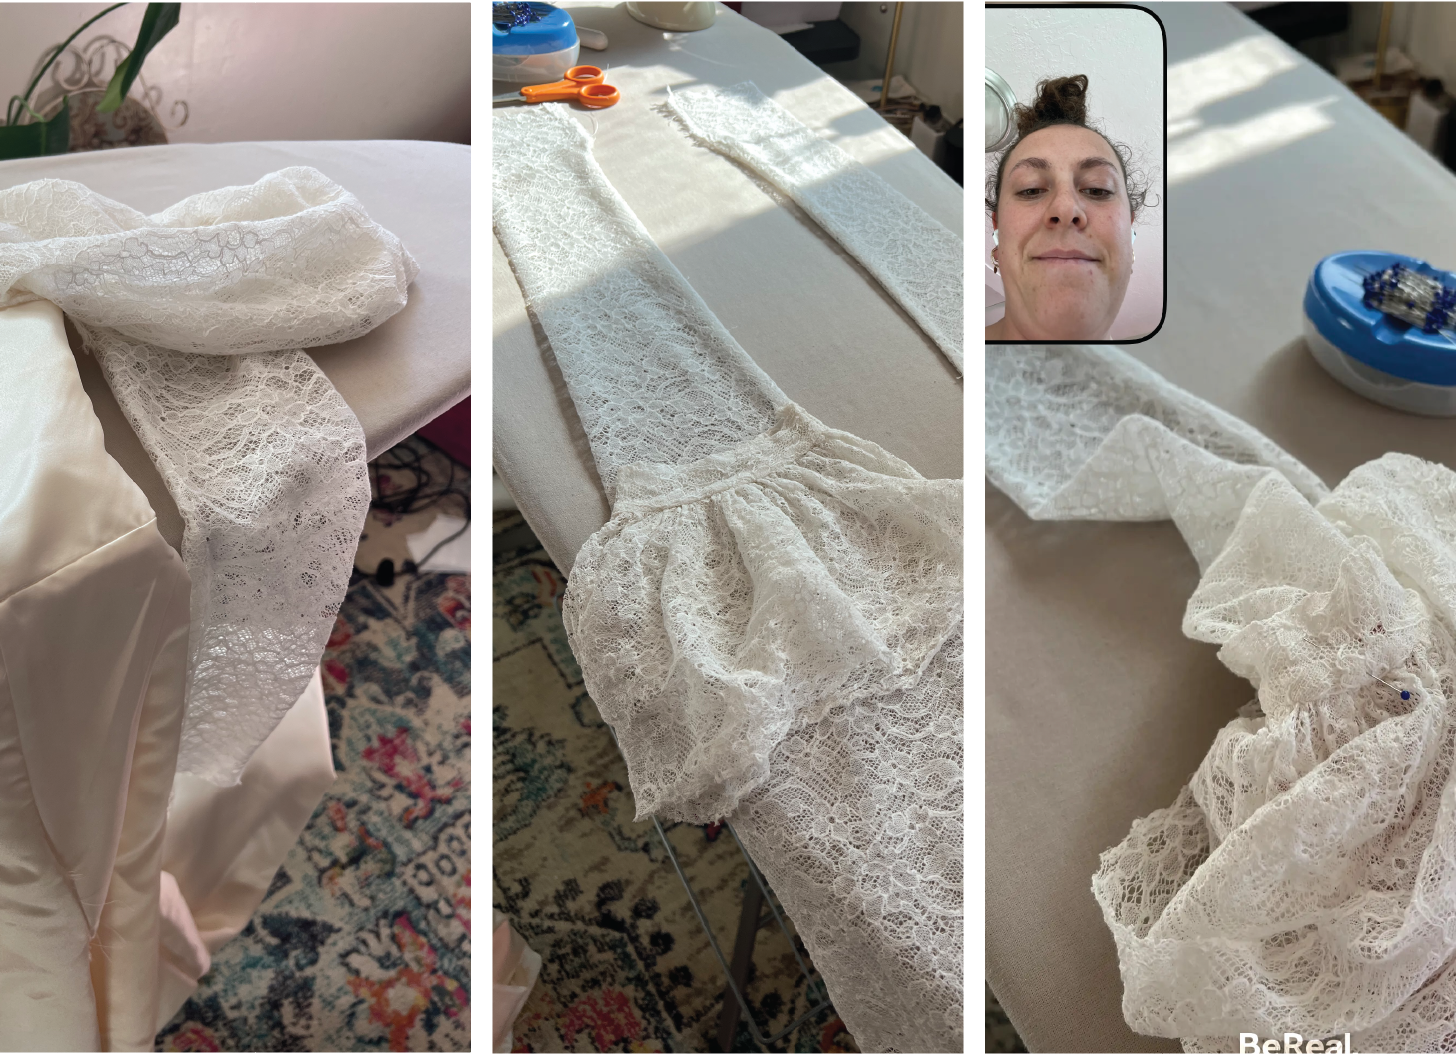
The color of the lace, matched to the $7 satin had solidified my decision to use the lace. Still hesitant, I went for it. After asking my grandma for permission, I started to deconstruct the dress. I carefully unpicked a few of the main seams, never cutting any of the lace, only unpicking the original structural stitching. The thread keeping the dress together was high quality, and as I deconstructed it, I was sure it was entirely hand sewn. I kept the sleeves intact, and once off the dress, started to experiment with them. They already had the round dimensions I wanted, so I didn’t want to change them further. I experimented with the sleeves for a week or two, while I started to create the wedding dress body.
I had done so many different renditions of the body at this point, I felt as confident as I could in making the final dress. I knew I could keep trying and changing things, but I also knew I needed to trust what I had figured out, and move forward. I decided to go over to Patty’s house to make the final dress cuts. Her house is as pristine as her gorgeous blonde bob. You will never find crumbs or dog hair in her perfectly vacuum-lined carpet. She has a massive sewing room, which was the perfect space to lay it all out. I cut the fabric with my favorite perfectly sharp sewing scissors my mother-in-law gave me, making it feel even more special. It all felt very surreal. To cut the final dress and begin to sew it was such a major mile marker in the process, one I felt extremely proud of.
It was so satisfying to see the bodice and skirt seams match up exactly how I wanted, and the train flow so beautifully to the ground. I decided to sew french seams on the entire dress. This technique is where you sew the raw seam, then fold it over, and sew it once again in thee same spot. This allows the fabric to fold over and the raw seam is hidden into the dress. To me, this added even more quality and luxury. It also allowed me to excel in this sewing skill.
Once the body was complete, my full focus went back to the antique lace sleeves. Although I had unpicked some of the main seams, at this point I was planning to create a sleeve pattern, to then cut out of the large pieces of the original lace skirt.
I refused to cut the lace until I knew exactly how I wanted the sleeves. It was a 1 shot thing and I was not about to ruin the antique lace. I tested out a few patterns using tulle and cheap lace. I figured out the main, tight forearm of the sleeve, but really struggled with the armpit. For some reason, my head couldn’t wrap my head around figuring out how to structure the armpit– given I was working with circumference measurements. I also wanted it to hang off my shoulder. Trying to figure out the armpit and how it was going to not only connect to the dress but keep the dress up was extremely frustrating and discouraging. I walked away many times frustrated and coming back to it over and over with no luck.
Amongst the discouraging confusion, I had a lightbulb moment: I could use the original sleeve. It already had an armpit, and it already fit me. My whole body filled with relief once I realized this! I took the original voluminous sleeve and rather than connecting it at the shoulder, it could hang off. The armpit could then connect to the dress as needed. It felt magical. I moved forward, doing exactly that. All I needed was the tight long-sleeved forearm pattern, which I expected to be easy. I confidently created a pattern for my arm measurements, tested it, and perfected it. It was now time to put it to the antique lace, and make the cut.
But it didn’t work. I tried to pin the pattern to the lace dress panels, and it wouldn’t fit properly on the fabric. The sleeve needed to be cut on a fold, and no panel had enough fabric to fold. Now came more frustrated brainstorming. I tried to match the pattern to all the lace I had, and none worked. I thought about not doing a fold, and using 2 pieces, and that still didn’t work. Everything I had so adamantly planned and worked toward, was crumbling, along with my ambition. Again, frustrated and discouraged I walked away.
Then, I had another lightbulb moment. There were 3 panels that made up the front of the skirt, and 2 on the back which were slightly larger. If I were to carefully unpick the 2 back panels, maybe just maybe, I could use them as the sleeves. I unpicked them, and sure enough- it worked. The back panels, when folded in half, were perfectly fitted to my forearm. I was in awe, absolutely astounded that they fit. With how the lace was so perfectly coming together, I started to think the 19th-century nuns that created the lace had something to do with it. Like maybe, they were nudging me with ideas and helping me along the way. Not only did the lace fit my arm perfectly, but there was additional fabric on the bicep allowing more fullness. From there, the additional lace swooped back, to connect in the front and back of the dress. It all just fit like a puzzle.
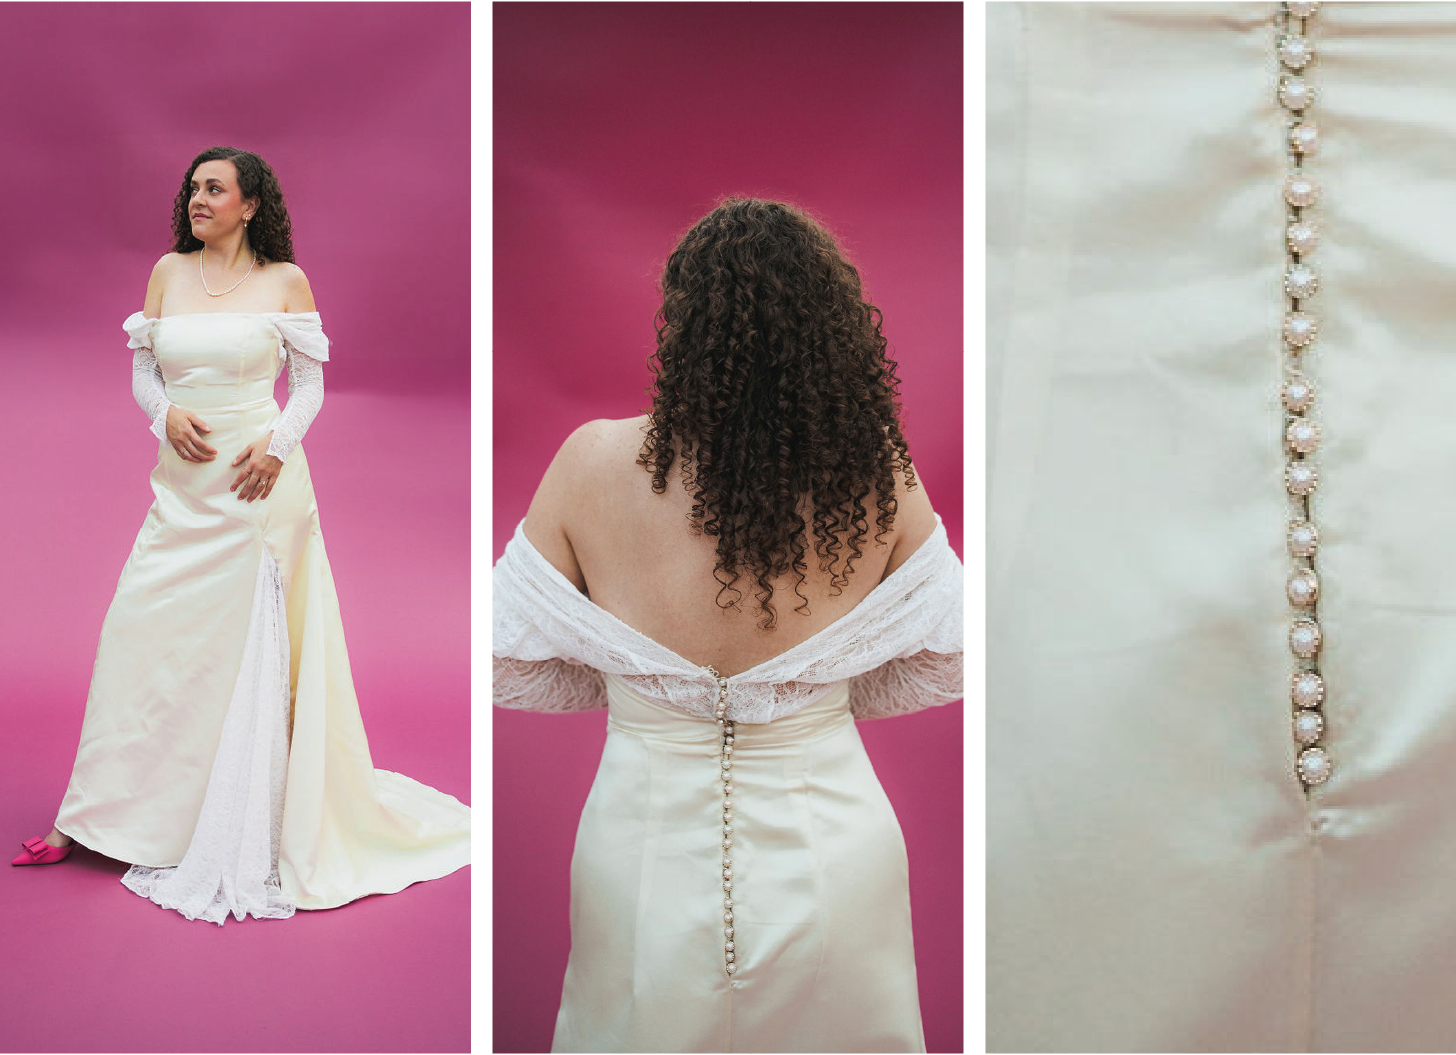
I never cut the lace. I only unpicked the original seams and reworked the fabric into my dress. I am amazed by this to this day. It worked out so beautifully. Once I took the back panels and sleeves of the original dress, to use for the dress sleeves, I had enough remaining fabric to use inside the slit.
With the dress sleeves being over the shoulder, it was important to me for it to not only be extremely secure, but to have a great inner bra. I decided to take an old bra that I had and deconstructed it. I sewed in this bra connecting to the lining. I added an invisible zipper, and then hand sewed small scallop pearl buttons along the back zipper.
On one of my final fittings, I noticed something I really did not like. When I deconstructed the bra, I left the structure the same, with the corners coming to a 90-degree angle at the center of the two cups. This cup shape created a balconette style originally. Unfortunately, this left corners on both paddings creating a bump in the center of the bust. I called it my third nipple. I didn’t have time to fix it before bridals, so if you know what to look for, it’s still there. The week before the wedding, I had to unpick the bottom of the dress (which I had finished and closed), go up into the bra, and adjust it by cutting the padding along the cup curve. I refinished the bottom, and it was done.
And it was done. It was over. 15 months, and I had succeeded.
I scheduled my bridals 1 week prior to the wedding. I felt that there was no better place to take them than in my sewing room, where it all began. I felt so confident and satisfied with how it all came together. I felt a deep appreciation for what I had created, sewing and fashion design. There was literally blood sweat and tears sewn into the beauty. It was a childhood dream, finally fulfilled.
The morning of the wedding, I took my time getting ready and had the ultimate self care day. I had my mom and grandma meet me at my house to help me fasten all the buttons and drive me to the venue. I felt so at peace, and only got nervous as I was waiting to walk down the aisle with my dad. In that moment it became very real, and nerve wracking. I was so excited for my soon-to-be husband to see the final dress, given he had only seen the final rendition on the mannequin throughout the process. He witnessed the dress in every stage, and was so supportive.
It took me 15 months to make the dress, yet it was only worn for 8 hours. The dress was by no means perfect, but I deeply valued and loved it. It was so humbling to look back and see how each piece of the puzzle came to be and how literally magical it all was.
I didn’t touch the dress again until a year later. The night of the wedding, I realized that the armpits of the dress ended up tearing. They were structured too tightly, so every time I gave someone a hug, the arms didn’t have enough give, resulting in tearing. This really bummed me out, given how hard I tried to take care of the precious lace. I’ve debated it ever since, wondering if there is a way to fix or salvage it. I don’t yet know the answer.
Because of the damage, I’ve been weary to dry clean the dress, with fear of further damage. The dress has lots of dirt and a subtle dog paw prints left on it, but overall it is in perfect condition. I’ve saved all additional fabric with the dress, in hopes one day it could be worn again or transformed into something new.
I will forever cherish this wedding dress of mine. It taught me so much about myself and pushed me to accomplish something extremely challenging. It’s crazy how much time and energy you put into a wedding, and how fast it all goes down. It gave me even more appreciation for dress designers. I’ve considered since, whether I would do it again, knowing what I know now…and I would, absolutely. When I think about planning our wedding, I think about making my dress. Pushing myself to take up a childhood hobby, and being resilient in accomplishing this dream.
And I did accomplish my dream. That's pretty cool to have in writing.
Thank you for reading my wedding dress journey.
Thank you for being here, seriously, thank you 💕
